Home Improvement How-To's: Grouting
|
Grouting is the
process of filling the spaces between the tiles. The filler – grout –
comes in powder form in premixed colors. Follow the manufacturer’s
instructions to mix it. For a strong and colorfast grout, get the
right consistency using the least amount of water possible. Mix
thoroughly to minimize color variation. Only make as much as you can
use before it begins to set. Keep any leftover dry grout for future
repairs. |
||
|
SKILL SCALE Medium TIME
REQUIRED TOOLS
MATERIALS |
||
| STEPS | ||
|
|
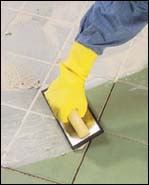 |
Pour a quart to half gallon of grout on the tiles. Holding a hard-edged rubber grout float at a 30-degree angle, spread the material in sweeping arcs, pressing it into the joints to fill them completely. |
|
|
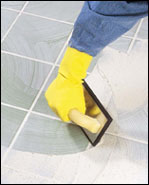 |
Hold the grout float at a 90-degree angle and sweep it diagonally across the tiles to remove any excess grout. |
|
|
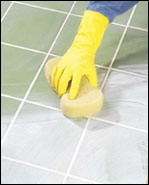 |
Wait a few minutes while the grout begins to harden. Wipe the tiles in a circular motion with a damp sponge, taking care not to drag out any of the grout from the corners of the tiles. |
|
|
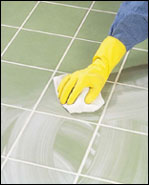 |
Once the grout has hardened, the tiles will be left with a slight haze on them. Clean it up by going over the area lightly with a damp cloth, then buff immediately with a dry cloth. |
|
|
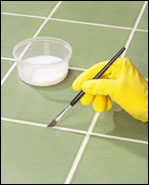 |
Let the grout dry for the length of time recommended by the manufacturer before applying sealer. Spread the sealer with a small paintbrush or a sealer applicator. Clean off any smears within the first 5 minutes or so. Then let the grout dry for at least 24 hours. |
|
|
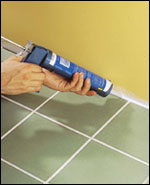 |
Caulk acts as both a sealer and as an expansion joint: it will flex if the floor expands or contracts as the weather changes. In wet areas, in front of a bathtub or shower, or wherever the expansion gap will not be covered with shoe molding, fill the gap with caulk and smooth it with a wet finger. |