
Home Improvement How-To's: Installing a Ceiling Fan
|
A ceiling fan will do
more than just give your air conditioner a break in the heat of summer
- it'll also take a load off your furnace in winter by re-circulating
heated air that rises to the ceiling. |
||
|
SKILL SCALE Medium
TIME REQUIRED
TOOLS
MATERIALS |
||
| STEPS | ||
|
|
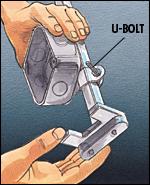 |
Turn off power to the existing light fixture at the main service panel, test for power, and remove the existing fixture and electrical box. Attach a 1 1/2-inch-deep metal light-fixture box to the brace bar using a U-bolt and two nuts. |
|
|
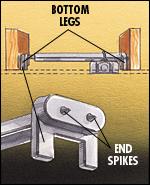 |
From the attic, position the brace between ceiling joists so the bottom legs are flush with the bottoms of the joists. Rotate the bar by hand to force its end spikes into the joists |
|
|
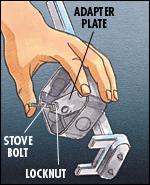 |
Attach the included stove bolts to the adapter plate with locknuts. These are the bolts that will support the fan. Insert the adapter plate into the box so the ends of the U-bolt fit through the holes on the adapter plate. |
|
|
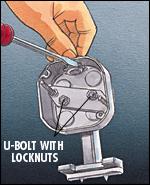 |
Secure the adapter plate by screwing two locknuts onto the U-bolt. Open one knockout for each cable that will enter the electrical box, and attach a cable clamp to each knockout. |
|
|
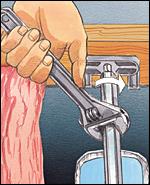 |
Tighten the brace bar one full rotation with a wrench to anchor it tightly against the joists. Feed the existing circuit cable into the electrical box, and secure it with a cable clamp. |
|
|
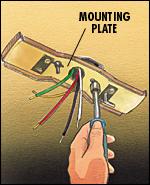 |
Place the ceiling fan's mounting plate over the stove bolts extending through the electrical box. Pull the circuit wires through the hole in the center of the mounting plate. Attach the mounting nuts, and tighten them with a nut driver. |
|
|
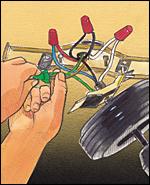 |
Hang the fan motor from the mounting plate's built-in mounting hook. Connect the wire leads using wire connectors: the black circuit wire to the black wire lead from the fan; the white circuit wire to the white lead; and the grounding wires to the green lead. Finish assembling the fan and the light fixture according to the manufacturer's directions. |