Home Improvement How-To's: Weatherproofing Your Windows
|
Windows contribute
enormously to the beauty and personality of our homes. Yet they are
the single largest source of energy loss (that's money out the window,
so to speak). You can save money on your utility bill with some simple
preventive maintenance |
||
|
SKILL SCALE Easy
TIME REQUIRED TOOLS
MATERIALS |
||
| STEPS | ||
|
|
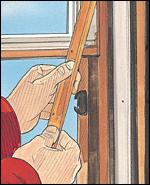 |
Cut and install metal V-channels in the sash channels of your windows. The V-channels should extend at least 2 inches beyond where the sash ends when the windows are closed. Attach the V-channels with a tack hammer and the fasteners provided with the material you purchased. |
|
|
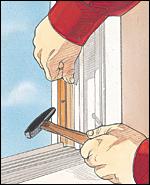 |
Drive the fasteners flush against the stripping so the window sash will not snag them. Next, flare out the open ends of the V-channels with a putty knife to create a tight seal with the sash. |
|
|
 |
Wipe down the underside of the bottom sash with a damp rag and wait for it to dry before attaching either self-adhesive compressible foam or high-quality neoprene strips to the outside edge of the sash underside. Which material you use depends upon your climate. If temperatures drop below about 50 degrees F, self-adhesive strips won't stick to the surface and you should use neoprene strips. |
|
|
 |
Seal the gap where the top sash meets the bottom sash. For double-hung windows, lift the bottom sash and lower the top sash to create access to the bottom rail of the top sash. Tack a metal tension strip to the inside face of that bottom rail. If your windows are single-hung with a stationary top sash, then you'll want to tack tubular gasket or reinforced felt to the outside face of the top rail on the bottom sash. Make sure you position the strip so it compresses slightly against the top sash when you close and lock the window. |
|
||
|
|
 |
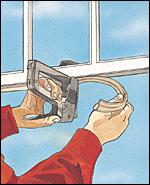
Apply caulk around the interior window casing with clear silicone caulk. If you are sure you will not want to open your window during winter, you can increase your protection even more. Simply lock the window in the closed position and caulk the gaps around the interior edges of the sash with clear, peelable caulk. When the temperature moderates, you can easily remove the caulking. Want to do more? Add plastic sheeting, or a shrink-wrap product, to the windows. This sheeting is applied to the interior of the window and successfully blocks drafts and keeps moisture away from window surfaces. Follow the manufacturer's installation directions, which often include using a hair dryer to tighten the plastic and remove wrinkles, making it almost invisible. You can also install exterior plastic sheeting on the outside of your window. Just follow the manufacturer's directions. Tacking or stapling strips are often included with this product. |